The Clarys review the Wheeler Ultra Scope Mounting Kit.

USA – -(AmmoLand.com)- Over the past few years, we have tested and reviewed each of the primary products in this kit: The F.A.T. Wrench, Laser Bore Sighter, and Reticle Leveling System. All were superb and handy tools. We often wondered why they were not included in a single kit with one carrying case.
Well, it finally happened, and we are happy to give a brief discussion of each and their benefits to every shooter that uses a scope.
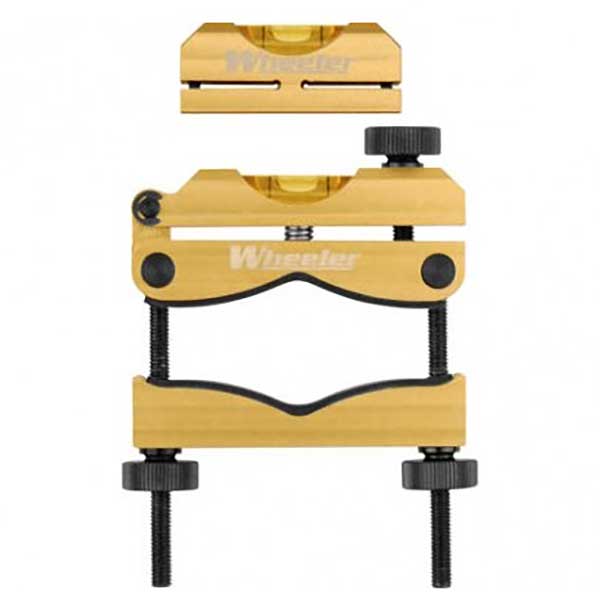
Wheeler Engineering Reticle Leveling System

First up is the Reticle Leveling System. Most everyone knows that if the reticles in a rifle scope are not properly aligned, the elevation and windage adjustments will not be true and the resultant cant is sure to impact bullet placement adversely. The instructions are so simple that rather than paraphrase them, we will simply quote them, as follows:
“The system is comprised of two machined aluminum level housings calibrated to their integrated levels. The Barrel Clamp Level is attached to the gun’s barrel while the smaller Reference Level is placed on scope base, bottom half of a ring or other flat surface perpendicular to the vertical axis of the gun. The gun is then rotated until the Reference Level is aligned. The tuning adjustment knob on the Barrel Clamp Level is then turned until its level is centered to match the Reference Level. At this point the Barrel Clamp Level is calibrated to the guns axis. The scope can be installed loosely and the Reference Level placed on top of the scope’s turret cap. The scope is rotated until the Reference Level is aligned with the Barrel Clamp Level and then simply secured in place.”
Wheeler Engineering F.A.T. (Firearm Accurizing Torque) Wrench

Once the scope is secured, it is time to bring out the F.A.T. (Firearm Accurizing Torque) Wrench. The F.A.T. wrench is a handheld torque wrench which allows you to apply accurate and recommended torque settings on scope rings, action screws and floor plates of your gun. Consistent torque on scope ring screws insures that your scope doesn’t work loose over time which will affect your accuracy. It provides torque adjustments from 10-inch pounds to 65-inch pounds, +/- 2 pounds.
The quarter-inch drive comes with a set of 15 bits as follows:
- Leopold/Buehler windage bit #10 flat blade
- bit #11 flat blade bit #32 flat blade bit 3/32″ Allen bit 5/32″ Allen bit T10 Torx bit T15 Torx
- bit Torx bit drive adapter bit
The following torque recommendations (from Wheeler) are for the most common screws used in mounting scopes.
Wheeler Engineering Laser Bore Sighter

And finally, we come to the Laser Bore Sighter. As most shooters know, the bore-sighting a gun does not sight-in the firearm. It merely means that you should be on paper at 25 yards. After that, it is generally an easy matter to “walk your rounds” into the bullseye via incremental scope adjustments.
Before the invention of practical lasers, most of us relied on optical bore-sighters like Sweeney. They worked quite well, but were expensive and required a different spud for every caliber. The Caldwell laser bore sighter eliminates the requirement for spuds as it incorporates a powerful magnet which firmly attaches the unit to the barrel of your rifle. It is not necessary to precisely center the LBS for accurate results.
The following instructions from Chuck Hawks, editor of Guns and Shooting Online illustrates how easy the task is:
“Note the vertical distance between your line of sight and the center of the barrel’s bore. (This is usually 1.5-2.0 inches for scopes and optical sights and about ¾” for iron sights.) Turn on the laser and adjust the position of the rifle to get the laser dot on the target. Adjust your scope or sights so that the point of aim is ½ of the distance between your sight line and the bore, directly above the laser dot on the target. For example, if your scope is 1.5″ above the bore of your rifle, adjust your scope’s crosshair so that it is aimed 0.75″ directly above the green laser dot at 25 yards. Your firearm is now bore sighted. Turn off the laser and remove the PLBS from the muzzle.”
The specifications for the Wheeler Engineering Laser Bore Sighter is:
- Compatible with a wide variety of guns and any caliber
- The high powered green laser is visible in daylight
- Attaches magnetically to the end of the barrel without arbors, adapters or clamps
- A magnetic connection is precise and non-damaging to the bore
- Machined aluminum body
- Soft rubber over-molding houses the laser module
- Lithium 123A battery included
- Each unit is hand calibrated at the factory
This kit, while a bit pricey with an MSRP of $262.99; however, if you have a full battery of rifles and like to “rotate your scopes” or try out new ones, it is well worth the investment. If you purchased the items separately, it would be over $300, so the kit savings is worthwhile. We like this kit and recommend it to anyone who does a lot of shooting.

About Jim and Mary Clary:
Jim and Mary Clary have co-authored over six hundred published articles (and counting) on shooting and hunting. You can read many of them on AmmoLand News.
