Tom McHale schools us on how he builds range logs with precision rifle data for getting on zero when long-range shooting.

USA –-(Ammoland.com)- Not too long ago, we covered the steps for zeroing or sighting in a rifle. Generally done at 50, 100, or maybe 200 yards, that’s only the first step to preparing to shoot at longer ranges. While zeroing verifies that your bullets are impacting at a fixed distance, say 100 yards, calibration goes much further to make sure that your scope, rifle, and specific ammunition are all in sync at farther distances.
Precision Rifle Data

When you zero your rifle at 100 yards, you’ve done a couple of things.
You’ve adjusted your scope to make your specific ammo type hit a certain point on the target when shooting from a certain distance. You’ve also adjusted your scope’s turrets to read “zero” for both windage and elevation. In theory, with that accomplished, you can just dial in distances changes to your scope’s elevation turret and hit a target at some farther distance down range. In theory.
Here’s the problem. While your ballistic computer may be precisely accurate in telling you that exactly 23 clicks will get you on target at some more extended range, that may not happen in reality.
The ballistic computer may be providing incorrect results. Your velocity may not be exactly what you think it was. The actual atmospheric conditions may not be accurately reflected in the computer’s calculations. The internal scope adjustments may not be moving elevation in exactly .1 mil or .25 MOA increments through all of those clicks.
Or maybe your scope mechanics are perfect, but your scope adjusts in one inch per 100-yard adjustments rather than 1.04 inches per hundred.
There are lots of reasons that the predicted elevation (and windage) adjustments won’t exactly match what’s actually required.
That’s why it’s important to verify your actual adjustments required using your rifle, scope, and ammunition. Let’s walk through the process of collecting some precision rifle data.
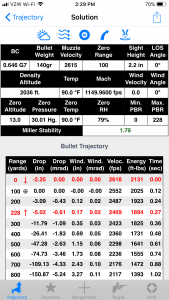
Once the rifle is zeroed at your preferred distance, 100 yards in this case, you’ll want to calculate your bullet drop at different distances. Using a ballistic computer, either enter or capture current environmental conditions as appropriate. You’ll also need to enter information about actual muzzle velocity, scope height, zero distance, and other basic information. You can get more information about using a ballistic computer here.
For this calibration, I used two different ballistic computer tools: a Kestrel Elite Weather Meter with Applied Ballistics and the Ballistic AE program for iPhone. As there are so many variables, the two tools didn’t exactly agree on the elevation adjustments. The scope I was using, a Steiner T5xi has windage and elevation adjustments in milliradians with each click representing 0.1 mils. I had available targets at 100, 300, 600, and 800 yards, so I ran the numbers for those distances.
| Range | Kestrel Applied Ballistics | Ballistic AE App |
| 100 | 0 mils | 0 mils |
| 300 | 1.13 mils | 1.09 mils |
| 600 | 3.80 mils | 3.46 mils |
| 800 | 6.01 mils | 5.24 mils |
You’ll notice that the bullet drop forecasts don’t exactly match between the two tools. That’s not as unusual as it may appear for a number of reasons. For starters, the Kestrel captures actual conditions while the app grabs the best available data from the nearest weather station. The underlying ballistic models [math] are also different.

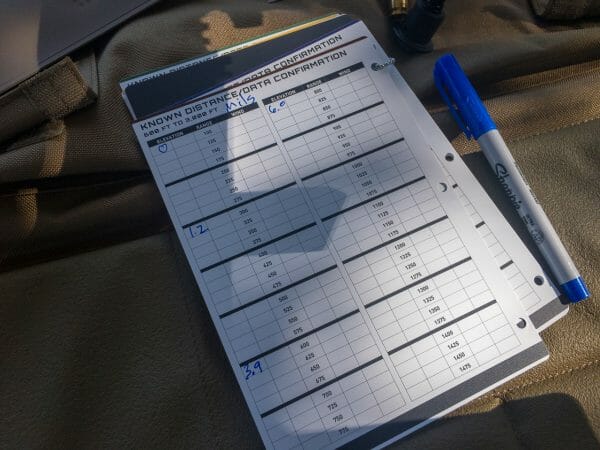
So, when I take my rifle to the next F-Class competition, which adjustment do I use for 800 yards, 3.8 or 3.46 mils? That’s where the calibration process becomes essential. The goal is to check and verify these numbers, and in the process, build a data card that I keep in my Magpul CORE Precision Rifle Data Book, that tells me what exact adjustment did adjust the point of impact properly.
I started at 300 yards with a 1.1 mil adjustment. After firing a three-shot group, I found that my bullets were impacting an inch or so low with that setting. At 300 yards, one whole milliradian translates to 10.8 inches because a single mil is 3.6 inches at 100. Three times 3.6 gives you… 10.8 inches. I increased my scope adjustment to 12 clicks, or 1.2 mils, and shot another group which impacted just where I wanted. So, my first databook entry was to note that I needed 1.2 mils of adjustment at 300 yards.
At 600 yards, given that the Kestrel solution was closer, I started with 3.8 mils of turret adjustment. Again, I was close, but a couple of inches below my desired point of impact. Since I was about two inches low, I increased by one more click, or .1 mils to 3.9 total, and fired again. Right on target. So, at 600 yards, my databook entry notes a 3.9 mil adjustment.

At 800 yards, I repeated the process, and once again, the Kestrel was almost right on the money. An exact 6.0 mil adjustment put me right on a four-inch painted bullseye. The databook gets an entry of 6.0 mils for 800 yards.
Now that we’ve verified and noted this information, it’s important to recognize that it only applies if I am using the exact same rifle, scope, and ammunition. Even changing to another 6.5mm bullet of the same 140-grain weight would throw me off and I’d need to repeat the process. This data also only applies when I am shooting at similar altitude and atmospheric conditions.
Here’s the point where you have to figure out how complicated your data logging process needs to be or not be.
Depending on how and why you use your rifle, you can choose a Precision Rifle Data logging method that’s super simple or infinitely complex. If your business has “sniper” somewhere in the title, you’re already using a method more complex than shown here. For all other shooters, you might think of two general scenarios. First, if you shoot in the same general area under similar conditions, you can adopt a very simple logging method. Second, if you travel for hunts or competitions to areas at different altitudes and with differing atmospheric conditions, then you’ll need to get a bit more sophisticated.

Since I do all of my shooting, at least with my guns, in the same area, I can go the simple route. The simple method involves a one-time calibration to reconcile what your bullet and scope are supposed to do with what they actually do at different distances. I’ve already captured actual adjustments for 300, 600, and 800 yards. On future range trips, I’ll want to set up targets at various distances in between so I can build a data card that shows me actual scope adjustments required for every distance between 100 and 1,000 yards. I’ll start with 100-yard increments, but over time I’ll likely add in 50-yard values too, so, for example, I’ll know my exact adjustment for 450 or 950 yards. Since my data is relatively simple, I can either write it down in a logbook, jot it down on an index card and tape it to my rifle’s stock, or even create a circular card to stick inside my scope cover cap.
On the other hand, if I’m going to be shooting in different conditions, I’ll need a way to capture and log data for different altitudes and atmospheric conditions. One way to do this is to create a notebook which captures the conditions for every shot you take along with the altitude and atmospherics. While thorough, there is an infinite number of variables and you’ll eventually fill up a phone book.
Density Altitude System
Another approach to account for atmospheric changes is to use the Density Altitude system. Density Altitude is a calculation that takes into account altitude, temperature, and barometric pressure to create an “adjusted” altitude number that reflects the actual air density. For example, where I did this test at an exact altitude of 15 feet above sea level, the density altitude worked out to 2,036 feet. If I’m in other conditions where density altitude is roughly equivalent to 2,000 feet, I can use the same adjustments.
By using density altitude to capture actual results, you can create performance zones for ranges of density altitude values. Check out the chart in the photos above, and you can see how the Magpul folks have built their data book in just this way. Every atmospheric condition in the same color band on their chart will use the same group of actual scope adjustments for windage and elevation. Since ballistic adjustment mainly boils down to how “thick and goopy” the air is, the density altitude system allows you to use data for ranges. For example, a Density Altitude of 7,300 could result from 115-degree heat at 3,000 feet of actual altitude or 20-degree temperatures at 8,000 feet actual altitude. As you shoot in different density altitude conditions, just record your actual adjustments, and before too long you’ll have calibration data for different density altitude groups.
While we’ve just scratched the surface, the important takeaway is to determine a process to capture your actual results data so that you can replicate shots at a later date. Even if you start as simply as recording actual elevation adjustments for different ranges, you’re moving in the right direction. If warranted, you can begin to capture more specific data including different atmospheric conditions, performance in different wind situations, cold bore results, and impact shifts when adding or removing a suppressor.
About
Tom McHale is the author of the Practical Guides book series that guides new and experienced shooters alike in a fun, approachable, and practical way. His books are available in print and eBook format on Amazon. You can also find him on Facebook, Twitter, Instagram, and Pinterest.
